Wednesday, February 27, 2013

The Ultimate Rainbow Birthday Cake with Whipped Nutella Icing


Last weekend was my roommate's birthday, and since she is a super awesome roommate, I wanted to make her a super awesome cake.

Cake:

-3 Boxes White Cake Mix + whatever the box calls for the make the cake. If it calls for oil, I always substitute an equal amount of butter, and if it calls for water, I substitute whole milk. You will be rewarded with a much fluffier, moister cake.
-Gel Food Coloring

Icing:

-Tub of Nutella (the small size)
-Tub Chocolate Icing (whatever kind you like)
-Tub of Cool Whip
-1 package chocolate pudding mix

1. Preheat oven to 350F (always, duh).
2. Prepare one box of cake mix according to package directions (or with butter subbed for oil and milk subbed for water if you want your cake to taste better). Divide the cake mix into two bowls. Add red and blue to one bowl (to make purple) and blue to the other bowl. Mix thoroughly. My purple didn't look too hot here, but it turned out pretty!


2. Line 2 round cake pans with tin foil. This is a huge time-saver! It allows you to gently lift your cakes out of the pans so they can cool while you bake your second batch. Additionally, you don't have to wash the pans, and I like to wash as few pans as possible.


 3. Bake according to package directions. When done, remove cakes on their tinfoil liners and set aside to cool.

4. Make your frosting while the first cakes are baking so it can sit in the fridge before you frost your cake. Make the chocolate pudding according to package directions. When you're done, eat 1 cup of pudding (at least that's what I did). The second cup of pudding gets mixed together with the entire tub of Nutella, the entire tub of chocolate frosting and the entire tub of Cool Whip. Put the bowl of frosting in the refrigerator on the highest shelf (I hear calories are scared of heights and jump out).

4. Prepare second box of cake mix, divide, and add gel colors to make green and yellow. Bake. Remove cakes and set aside to cool.

5.  Same thing again! Just with red and orange. Bake, and let your cakes cool. They need to be cool before you frost them or the frosting will melt all over the place!

6. When all 6 of your cakes are cool, stack them in reverse rainbow order - purple, blue, green, yellow orange, red. They make look kind of lumpy, floppy and discolored (see below), but don't worry! We will fix that!


7. Take a large, serrated knife and cut vertically into the cake. Slide your knife around the circumference with short, rapid strokes to remove the outer 1cm or so of cake. It is important to use a serrated knife for this step. Using a non-serrated one will just pull chunks of cake off instead of making smooth cuts, and you will end up with a mess. 


8. Remove the cut off bits, and you should have a tall stack of gorgeous, rainbow confection!


9. Okey doke, now disassemble your cake. Leave the purple layer on whatever plate you want to serve the cake on. Put the other cakes off to the side. Using a small rubber spatula, spread icing on the top and sides of the purple layer.


 10. Gently place the blue layer on top of the frosted purple layer. Make sure the cakes are centered on top of one another. Use the spatula to ice the top and sides of the blue layer. Repeat with the rest of the layers.


11. When you have frosted all the layers, smooth out any lumps and bumps with a knife, and decorate however you'd like!  I piped on some green frosting (I kind of ran out of patience at this point, so I didn't do a great job with the green frosting!), and added some sprinkles. It says "Yay, Megan!," because she's an awesome roommate!


How awesome is that?  Every time I open the fridge I admire how freaking cool it looks and remind myself what an excellent baker I am. Sometimes self-indulgent congratulations is necessary and proper.


Note: I think this would work equally as well with 2 boxed cake mixes divided into thirds if you didn't want your cake to be quite as tall. However, I think the height adds an element of drama, and a rainbow cake should be dramatic!

Wednesday, February 20, 2013

Super Healthy Skinny Stuffed Peppers


This is a quick, easy weeknight recipe packed with vitamin A, vitamin C, iron and calcium. It's super high in protein and fiber, and low in fat. ALL FOR LESS THAN 300 CALORIES!

I make enough stuffing for 4 peppers, but only make 1 pepper at a time, and save the stuffing for another night's dinner (or to share with a friend)!

1/2 tbsp olive oil
4 bell peppers (any color)
1/2 cup quinoa (any color)
1/2 can black eyed peas, rinsed and drained (or black beans, kidney beans, whatever beans you have)
1/2 can no-salt added corn, rinsed and drained
1/2 yellow onion, coarsely chopped
1/2 cup salsa (I used medium)
1 garlic clove
1 cup frozen broccoli
1/2 packet taco seasoning (I had the "cheesy" kind)
8 tbsp. low-fat shredded cheese
A few squirts hot sauce (optional)


1. Pre-heat oven to 350F. Cut a hole in the top of each pepper and remove core and seeds. Microwave peppers on a plate: for 1 pepper, microwave for 2 min 30 sec, and for 4 peppers, microwave approximately 3 min 30 sec. or until they are slightly softened.

2. Fill a pot halfway with water. Add quinoa, cook on high at a boil until fluffy and soft, about 15 minutes. I never wait for the water to boil; I just throw stuff in right away, and it has never made any difference (pasta, rice, quinoa, potatoes etc).

2. Heat the 1/2 tbsp olive oil on high in a large saucepan. When oil is hot, add the onion and garlic. Let cook for approx. 5 min or until softened. Add the 1/2 taco seasoning packet.

3. While the onions and garlic are softening, open your cans of beans and corn to rinse and drain them.

3. Add the frozen broccoli. No need to microwave, just throw it in. Add 1/2 the can of beans and 1/2 the can of corn. Save the leftovers in the fridge or freezer for something else.

4. Turn heat down to med-low and add the salsa. Let the saucepan mixture cook until the quinoa is done.

5. When the quinoa is done, drain it in a colander, then add it to the saucepan and stir until well-mixed.  Add hot sauce or tabasco if you like things a little spicy!

6. On a cookie sheet or baking dish, lay out a piece of aluminum foil. Take a pepper and tent the aluminum foil around it to make a little bowl around the outside of the pepper to support it when it softens and to prevent any leakage. Stuff the filling into the pepper, pressing with the back of a spoon to pack in as much filling as possible. Top each pepper with 2 tbsp. low-fat shredded cheese.

7. Bake for 15-20 minutes until pepper is soft and fully cooked.


Nutrition Facts:

Serving Size: 1 stuffed pepper                             Calories: 271
Total Fat: 7.4 g                                                   Saturated Fat: 3.2 g
Trans Fat: 0 g                                                     Cholesterol: 15 mg
Sodium: 289 mg                                                  Total Carb: 40.5 g
Dietary Fiber: 7.5 g                                           Sugars: 7.8 g
Protein: 12.7 g                                                    Vitamin A: 82 %
Calcium: 14%                                                     Vitamin C: 295%
Iron: 20%


Tuesday, February 19, 2013

Monday, February 18, 2013

Cute Pictures of Cats


99.9999% of the time I just adore my kitties. Most vet students have an underlying note of "Crazy Cat Lady" hidden somewhere in their personalities, and given free rein we will snatch up every sob-story, abandoned, abused, neglected kitten we can find, and love them like they've never been loved before. However, 0.0001% of the time, my cats turn into carnivorous, fake-plant hunting demons ready to stalk and kill any rogue carpet fuzzies or dangling phone chargers in their paths, and it takes all of my self-control not to make them someone else's sob stories.

I have a small litterbox for my cats in a corner of my room next to my desk. Dahsu, my little smush-faced cat, took a fat stinky crap, covered it up, then leapt DIRECTLY from the litter box onto my desk, spraying freshly shat-on litter all over my notes.

Dahsu also likes to steal highlighters and hide them, so that my freshly-bought Sam's club pack of highlighters dwindles in a matter of weeks.

 Dahsu and my roommate's cat, Gibson, like to tear around the house at warp speed, skidding through the corners on the hardwood, knocking off refrigerator magnets as they go. They think it's especially funny to knock breakable things from high places and watch with glee as they shatter on the floor.

Bandit, my other cat, likes to stare at blank walls like there's something inside them only he can hear. All of the sudden, after staring at the wall for several minutes, he will bolt away at top speed and claw his way up to the top of his cat tower like he was racing an invisible demon. He will also bite any body part I leave exposed when sleeping hard enough to draw blood if he is even remotely hungry. When I bolt upright out of dead slumber, screeching in cat bite agony, Bandit plods dramatically over to his empty food bowl, meowing pitifully, and making big doll eyes at me, as if he's been starved for months and even just one lonely kibble would satisfy him.

The other roommate's cat, Oscar, is the sneaky one of the bunch - he waits until 4am to knock over the downstairs trash can in a desperate search for chicken scraps. Oscar only has about 5 teeth left and can still manage to down an entire drumstick before we get downstairs. Additionally, if ANY animal food is left within his reach, Oscar will chew a hole in the bag to get inside. This applies to any and all bagged animal food - he once chewed a hole in a bag of horse hoof growth supplement I left not-so-out-of-his-reach on a table.

Enjoy some cute cat photos. Highlighter thief!


Saturday, February 16, 2013

Flower Rockets


I am a sucker. I *know* that all those As-Seen-On-TV things are worthless, overpriced crap. I buy it anyway. I am the target audience. I couldn't turn down these "Flower Rockets," said to have 1,000 seeds in 20 different flower varieties, which will bloom constantly with different flowers all summer long. I thought I was getting 2 "rockets" (the green circle things) for $6.95, so I ordered 3 (for a total of 6). BUT WAIT!! They DOUBLED my flower rockets and sent me 12!  I planted them today. I put 3 in one pot, 6 in a big rectangular pot and 2 in another pot with some snapdragons.  The remaining one I just stuck in my garden to see what would happen. I'm crossing my fingers that they work!

Spring Gardening


The weather here has finally stabilized a little bit (i.e. not monsooning daily), so I bought a few pallets of flowers and planted them in the sad wasteland that was once my beautiful garden.

In December, everything was still blooming. The caladiums and coleus were on their last legs but still looked vibrant and colorful. The hibiscus and canna lilies were still blooming!


 The knockout roses bloom incessantly all year round!  I had to trim the bush back because it gets ENORMOUS every year!
 This angel's trumpet is about 12 feet tall. I planted it as a 2 ft stick January of last year. Amazing how fast these things grow!

Sigh. I can't wait for everything to bloom again this year!


I planted a few packets of zinnia seeds in late October because I had kind of a bald spot on this corner of the garden and they just exploded within a few weeks. 


This canna lily is one of the best investments I've made. I was warned that it might not do as well outside as it would indoors, but it has bloomed constantly since I planted it last May. I just trim up the dead-ish looking leaves and otherwise leave it alone.


Anyway, unfortunately, it RAINED and RAINED and RAINED and RAINED incessantly for about a month so everything drowned, so I am pretty much starting over with spring flowers.  I got a pallet of red snapdragons, multi-colored pink/yellow/orange snapdragons, pink dianthus and orange calendulas. I got some light purple wave petunias and blue daisies for pots. Additionally, I planted some orange gladiolus bulbs and some white caladium bulbs (which won't pop up until May probably). 

These are the Amazon Neon Duo Dianthus. I got some in cherry and purple. The purple ones are a super vibrant electric purple, almost like a highliter color.  They are supposed to get up to 3' tall, and are approx. 18'' now. 


The neon Dianthus are in the background. See how sad it looks? :(  Stupid rain. I planted a row of Super Parfait Strawberry Dianthus along the front, and a row of red snapdragons behind it. In the middle of this area is supposed to be a hydrangea, but it doesn't seem to like its spot there because it has grown about 3 leaves in 2 years. I keep hoping it'll make a comeback, but it may be time to pull it up. Around the hydrangea I have about 10 "Breast Cancer Awareness" hyacinths that kinda half-ass bloom, but it's really too warm in Louisiana to grow those outdoors.


I planted the orange Calendulas on this side with red snapdragons behind it. There are some black-eyed Susans that should bloom shortly (seeds planted in September), along with some gayfeather that may pop up eventually (they survived the rain but look a bit sickly).


An overview of the whole garden with my super awesome free slave labor sister in the background who helped me plant stuff since she was here visiting for Mardi Gras. It's just devastating to look at everything that died!

You can see how freakishly bright those neon Dianthus are. I may have to go get some more!

Along the side here I planted some more of the Strawberry Parfait dianthus, some of the multi-colored snapdragons (they're called like Malibu Beach or something). Closest to the house is a white Camellia and a walking iris that hasn't bloomed in 3 years. I'm hoping this year will be the year!
 These are some gorgeous blue Cineraria. They are so vibrant and lush! A bunch of petals fell off when they got rained on, so they might turn out to be more of a porch plant than a true outdoor plant. I paired the Cineraria with some light purple wave petunias.


One sad Calendula!  These flowers are so pretty and fragrant but they seem to be a little finicky, although my definition of finicky is that if I don't water them for 5 days and they die, they're finicky. I left them in the little 6-pack containers for a few days without watering and a bunch of them shriveled up. I went ahead and planted them even though some were a bit crispy. I always just cross my fingers and hope they'll make a comeback.
 Excuse the hose and crap in the background!  I wanted to get a shot of these Crotans (the red/orange/yellow plants), which I got 50% off last year, and are doing fabulous!  I want to get some more of them. They are so colorful, and grow super slowly so they don't overpower the annuals I plant around them!


Growing Food from Scraps


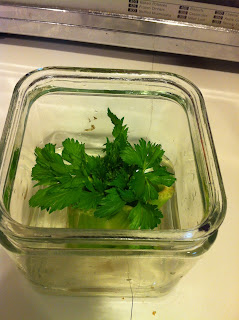
I have a lovely garden, but it's been so gross and wet recently that nearly everything has died a slow drowning death, so I've been experimenting with growing some indoor plants. Currently I am attempting to grow celery from a cut stump, and a pineapple. Pineapple plants supposedly take 3 years to grow a fruit, and I'm not sure I have that kind of patience, but we'll see.

The celery started with no leaves and no roots. In one week it had little baby rootlets and a bunch of leaves!


In two weeks it had even more roots and more leaves!  I'm gonna wait to plant it outside until the weather here stabilizes a bit.


 Unfortunately, a few days after this picture was taken I went to plant it outside and all the outside stalks had gotten all mushy and rotten, and the whole thing just kind of fell apart. Good thing I just got more celery to try again!

In two weeks the pineapple had really sprung roots up. I planted it in a pot a few days ago. Can't wait to see what happens!


Aww, Mr. Pineapple looks happy in his new home. That parasitic parsley in the background has been growing without me doing anything to it for 3 years. I do NOTHING to it. It still grows.